These notes concern the installation and operation of the Ref Tek 130 DAS (RT-130) and associated software. They fill in a few gaps that aren't explicitly addressed in the instruction manuals. I hope they're helpful.
Contents:
- Pinouts for connecting RT130S-01 to CMG6V seismometer posted 2017.01.02
- Errors in RTI 4.0 installation script posted 2016.10.02
- One liners posted 2012.02.28
- rtcc launch error: "dyld: Library not loaded" posted 2014.12.27
- Setting up a Mac mini as a Reftek data server posted 2011.05.26
- Using a Mac to set the RT-130's IP address
 Pinouts for connecting RT130S-01 to CMG6V seismometer
posted 2017.01.02 [Reftek 130S-01]
| 130 pigtail | CMG6V cable pin | |
|---|---|---|
| PWR (red) | … | c |
| GND (black) | … | b |
| Ch1+ | … | A |
| Ch1- | … | B |
Errors in RTI 4.0 installation script
posted 2016.10.02 [Mac OS 10.11.6 "El Capitan"; RTI 4.0]
Executing the RTI 4.0 installation script from the RefTek CD results in a series of error messages:
% sudo ./install Password: Installing files to /Users/reftek ... cp: ./rtcc_htm is a directory (not copied). cp: ./smcc_htm is a directory (not copied). cp: ../document/*: No such file or directory chown: /Users/reftek/document/*: No such file or directory chmod: /Users/reftek/document/*: No such file or directory Moveing QT programs ... mv: rename /Users/reftek/bin/rtqt_view.app to /Applications/rtqt_view.app: No such file or directory mv: rename /Users/reftek/bin/rt_display.app to /Applications/rt_display.app: No such file or directory Installing scripts ... Done Be sure to add /Users/reftek/bin to the execution path! Be sure to edit /Users/reftek/bin/*.ini! %
The result is an incomplete installation of the RTI tools. To fix the script, copy it to your home folder and make the following changes:
- Change line 39:
- The word
documentsshould be changed todocument. (The folderdocumentscan't be created, since there already is one calledDocuments.) - Change line 83:
- The phrase
cp ../documentshould be changed tocp ../documents. (It's referring to the folder nameddocumentson the CD.) - Change line 85:
- Change
chmod 444 $RTI_DIR/document/*tochmod 444 $RTI_DIR/document/* $RTI_DIR/document/RTU*/* - After line 1 insert this line:
- cd /Volumes/rti-4_0/macos64
With these changes, the script will perform a nearly complete installation, but with these two remaining errors:
mv: rename /Users/reftek/bin/rtqt_view.app to /Applications/rtqt_view.app: No such file or directory mv: rename /Users/reftek/bin/rt_display.app to /Applications/rt_display.app: No such file or directory
The first of these missing files, rtqt_view, is not included on the installation disk. The second one, rt_display, is distributed as a disk image in ~reftek/bin/rt_display.dmg. To install it, open a Finder window to ~reftek/bin, double-click on the .dmg file, and move rt_display.app to the Applications folder.
One liners
- Create a new
rtpdarchive (posted 2016.05.03) - % cd /path/to/archives % arccreate newArchiveDir "Short and pithy comment to identify this archive" % rtp restart
Look in
/path/to/archives/newArchiveDir. In a moment a new folder should appear, named after today's date (in YYYYDDD format).If you're starting a new time period (year, month, etc.) be sure to copy over any files from the old folder into the new one. Be careful not to overwrite the files now being written to today's folder!
If you have any other config files, source code, etc., that refer to the reftek archive dir, be sure to update them now!
- Use Safari to access the RTCC server (posted 2012.02.28)
- Chrome (17.0.963.56) fails to apply changes to RT130 via RTCC browser interface. Firefox (8.01/Mac OS 10.7.3 & 10.0.1 (on OS 10.5.8) does not render pages correctly (shows raw HTML source instead). Safari (5.1.3 on OS 10.7.3; 5.0.6 on OS 10.5.8) works perfectly.
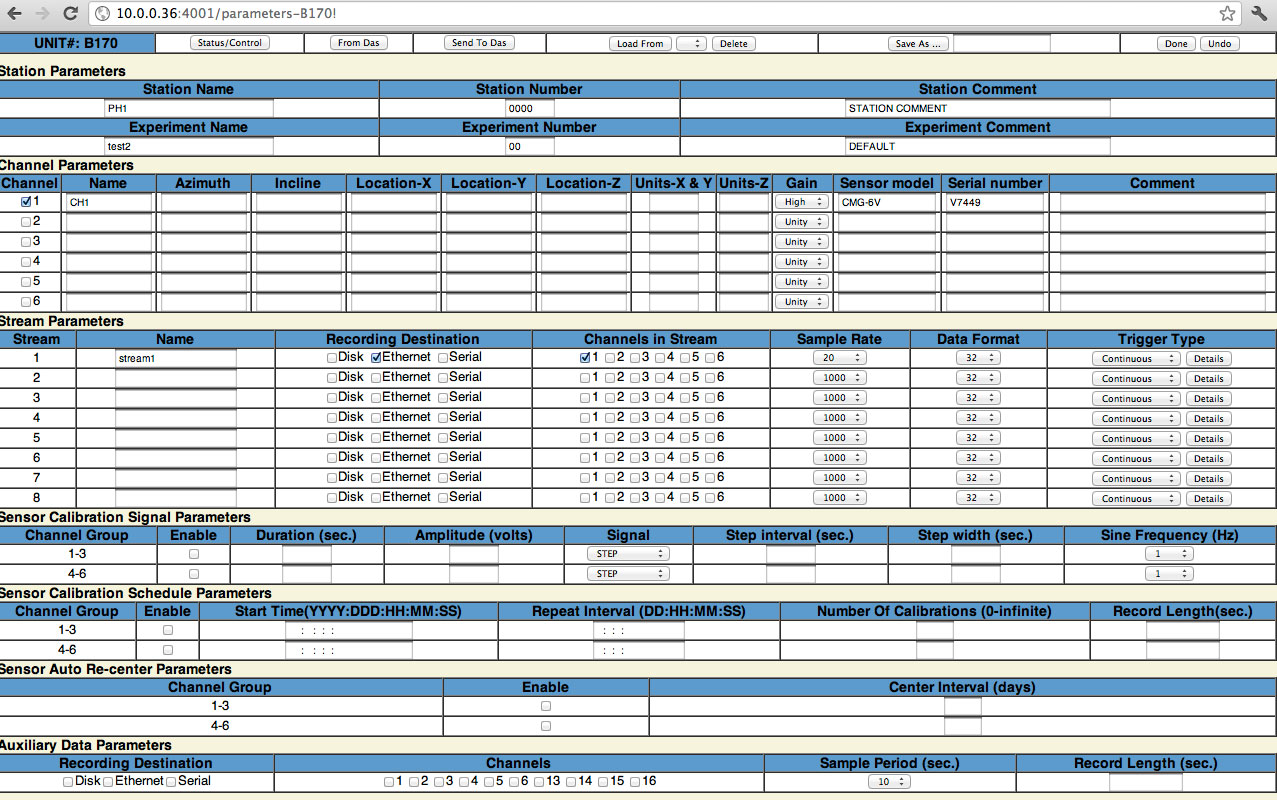
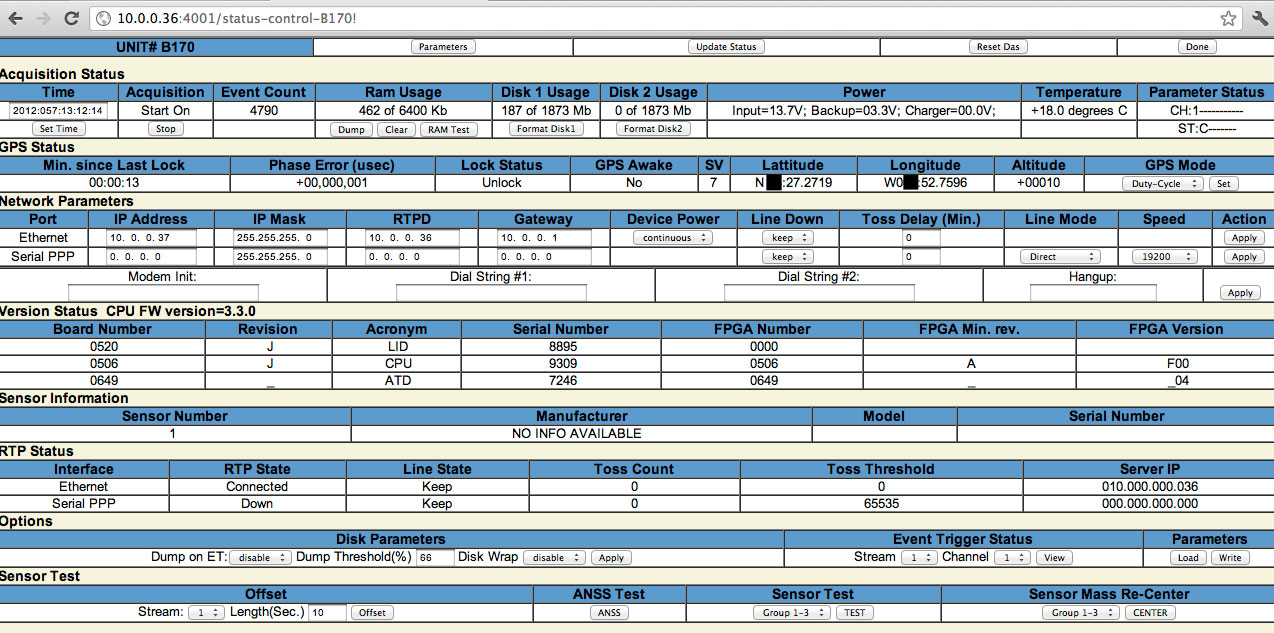
- RTCC screenshots of a healthy system (posted 2012.02.28)
- Parameters | Status
- Router address reservation: avoid "2"! (posted 2012.02.28)
- Reserving address 2 (e.g., 12.0.0.2) in my Netgear router's DHCP pool for the RTPD server doesn't work. If the server were temporarily disconnected from the network (e.g., power failure), upon reconnection the router would assign it a new address, breaking the whole RTPD/RTCC DAS. For some reason, the router consistently forgot the (reserved) MAC address of the server during outages. Any address other than 2 seems to work fine.
rtcc launch error: "dyld: Library not loaded"
posted 2014.12.27 [Mac OS 10.10.1 "Yosemite"; rtcc 3.0.90; arcutils 3.0.7.1]
Reftek recently provided the latest version of utilities (rtcc, rtpd, etc.) that run on Mac OS X 10.10 Yosemite. Most of these apps work straight out of the box on a pristine Yosemite Mac. A few, however do not, as they require dynamic libraries that are not part of the default Yosemite install. The problematic ones are: rtcc, rtpmonitor, and smcc. In this tech note I'll use rtcc to illustrate the fix.
Invoking rtcc in a Terminal window yields this error:
To see what libraries it needs, run otool:
The problem is that rtcc is looking for libraries where none exist on this machine. Taking libgd as an example:
Clearly this library is nowhere to be found. Happily, the missing library is easily installed using Macports. Follow the instructions on the Macports site for installing Macports, then install port "gd2". Important: Be sure to install the port as a 32-bit i386 dylib; if you compile it as a 64-bit x86_64, it will not work with rtcc! (you'll get a "wrong architecture" error). Keeping two separate versions of Macports around — one for managing 32-bit libraries and one for the 64-bit ones — is a royal pain, but it is doable. There are excellent instructions on the Macports site.
Let's assume that you've now installed the 32-bit "gd2" library port onto your Mac. Mine is here: /opt/loc32/lib/libgd.dylib. (I use Macports's default /opt/local directory for the 64-bit ports and my own (/opt/loc32) for the 32-bit ones.) Now we can correct the executable by using install_name_tool:
Now try running rtcc again:
This is actually good news! It tells us that we've solved the missing libgd problem, and that we've now moved on to the next problem: libpng is missing. To fix this, we run install_name_tool again:
Now try running rtcc again:
Success! rtcc now has all the libraries it needs.
Now that the Macports libraries are installed, it's a simple matter to use install_name_tool to correct the other two executables — rtpmonitor and smcc — just as we did rtcc.
Setting up a Mac mini as a Reftek data server
posted 2011.05.26
The Mac mini is a great platform on which to run Reftek's RTI software suite for seismic data acquisition. You can easily set it up as a headless server (no keyboard, no monitor) that you can stash in a corner somewhere, wirelessly tied to the RT-130 DAS via LAN. Once you set it up, you can forget about it. If the power fails, it will restart and automatically re-launch both rtcc and the rtpd daemon. You can access all the essential tools for DAS configuration, data display, and data retrieval remotely via LAN.
Here's an outline of how I got my Mini (OS X 10.6) to work with the RT-130 DAS.
Preliminaries
- Turn it on
- Leave the keyboard, mouse, and monitor attached, for now. Join your LAN (wifi or ethernet).
- Assign the computer a fixed IP address
- With your Mini connected to your LAN, login to your network router and assign the Mini a fixed (reserved) IP address on your LAN. This is a real timesaver; in the event of a power failure, the router would otherwise probably assign the Mini a different address, requiring you to edit the rtcc and rtpd config files accordingly.
In the following directions, I'll assume that the RT-130 has an address of 12.0.0.37 and the Mini an address of 12.0.0.6.
- Create a new user: "reftek"
- System Preferences → Accounts. Unlock the padlock icon ("Click the lock to make changes"). Create user "reftek" with admin privileges. Click "Create Account". Select "reftek" in the "Automatic login" popup menu.
Install the RTI software suite
- Install RTI
- Follow the directions in the RTI manual to install all the RTI apps from your Reftek CD (login as root, insert the installation CD, and run each of the installer scripts in the macos_i86 directories...). For example:
% cd /Volumes/[YOUR REFTEK CD]/rti/macos_i86/rtcc % ./install
- Install the RTI docs
- It's useful to copy all the pdf files from the Reftek CD onto the computer. To do this, launch Terminal and type the following commands:
% cd % mkdir rtdocs % cd rtdocs % find /Volumes/[YOUR REFTEK CD]/ -name \*.pdf -or -name \*.PDF -exec cp {} . \; %
Once you've done this, eject the CD. You're done with it.
- Create a data archive with arccreate
- (See the manual: RTPD.PDF, p.32 (section 4, p.21); or arcutils.pdf, p.11 (section 2, p.3).)
- Edit the rtpd config file (rtpd.ini)
- Add IP addresses to CmndClientIPAddr (to grant specific computers permission to communicate with the DAS) and change Archive to match the path to the directory created by arccreate.
- Edit the rtcc config file (rtcc/rtcc.ini)
- Add webclientipaddr lines as needed, to grant specific computers permission to access rtcc.
Test the installation
- Test rtcc on the mini
- Launch /Users/reftek/rtcc/rtcc. While rtcc is running, launch a web browser on the Mini and point it to: 12.0.0.6:4001 . This should get you to the "DAS Discovery Page". To connect to the RT-130, enter these on the Discovery page (p. 42 in the rtcc manual):
Host IP: 12.0.0.37 Port: 5000 Connection type: DirectClick "DAS-DISCOVERY".
This causes an additional line to appear on the screen, corresponding to the RT-130 unit. From here click "Status/Control" or "Parameters" to edit the RT-130's settings.
- Test rtcc from another computer on the network.
- Point a browser to 12.0.0.6:4001, as above...
- Test rtpd on the Mini
-
Launch an rtpd daemon:
% cd % rtpd -bd
Now launch rt_display by double-clicking it in /Applications. Choose "Connect" → "Connect to "RTPD". The words "Handshaking with rtpd" should appear at the lower left edge of the rt_display window. When a connection is made, go to "View" → "Select components"; a list of available DAS data streams should appear. If it does, rtpd is working.
If it isn't working, review the log files in /Users/reftek/log for clues.
The basic RTI installation is now working. Now it's time to setup the Mini for automated, unattended operation.
Fix the scripts in /Applications
During the RTI installation process, two shell scripts were installed in /Applications. As they stand, they don't quite work properly. Here's how to fix them:
- Fix /Applications/rtcc
- Open it with a text editor, and change it to read:
#!/bin/sh cd /Users/reftek/rtcc ./rtcc
Saving it with a text editor changes the "creator" and "file type" codes of the file, which means it won't run properly when invoked by the Finder during startup. To remedy this, from the Finder select /Applications/rtcc and do "Get Info". Change the setting in the "Open with" popup menu to the Terminal application.
- Fix /Applications/rtp
- As installed, this script doesn't quite work as expected (the options used with ps don't give the expected results). I also tweaked the restart command to give meaningful feedback about its success at restarting. Here's my fix (after editing, do the same "Open with" procedure as described above):
#!/bin/sh #******************************************************* # script to control RTPD under MacOS #******************************************************* #modified by jtb 20110507 ; 'ps' wasn't producing the output that this script expected RTPD_USR=reftek RTPD_DIR=/Users/$RTPD_USR RTPD_INI=$RTPD_DIR/rtpd.ini RTPD_OPT=-bd #******************************************************* # start RTPD #------------------------------------------------------- rtpd_start() { pid=`/bin/ps -eo pid,command | grep rtpd | grep -v grep | awk '{print $1}'` if [ "$pid" != "" ] then echo "rtpd is already running (pid = $pid)" exit 1 fi # Start up from a known location cd $RTPD_DIR # Start the processes echo "starting rtpd" $RTPD_DIR/rtpd $RTPD_OPT ini=$RTPD_INI } #******************************************************* # stop RTPD #------------------------------------------------------- rtpd_stop() { pid=`/bin/ps -eo pid,command | grep rtpd | grep -v grep | awk '{print $1}'` if [ "$pid" != "" ] then echo "killing $pid" kill $pid else echo "rtpd not running. Nothing to stop." fi } #******************************************************* # Get status of RTPD #------------------------------------------------------- rtpd_stat() { pid=`/bin/ps -eo pid,command | grep rtpd | grep -v grep | awk '{print $1}'` if [ "$pid" != "" ] then echo "rtpd IS running (pid = $pid)" else echo "rtpd is NOT running" fi } #******************************************************* # Select the operation to perform #------------------------------------------------------- case "$1" in 'start') rtpd_start rtpd_stat ;; 'stop') rtpd_stop rtpd_stat ;; 'status') rtpd_stat ;; 'restart') rtpd_stat rtpd_stop /bin/echo -n "waiting..." sleep 3 # allow the kill enough time to finish rtpd_start rtpd_stat ;; *) rtpd_stat echo "Usage: rtpd { start | stop | status | restart }" ;; esac
Prepare the Mini for headless auto-restart
- Create a restart script
- Create a text file with these lines:
#!/bin/sh /Applications/rtp restart #
(Be sure to leave a blank line at the end of the file.) Save this file as /Applications/rtp_restart. Then make it executable:
% chmod a+rx /Applications/rtp_restartFinally, from the Finder, do "Get Info" and set it to "Open with" Terminal.
- Allow other users on the LAN to access the Mac
System Preferences → Sharing → Check "Remote Login". Remote Login allows users to login via an ssh session (use the Terminal app to run ssh).
System Preferences → Sharing → Check "File Sharing". File Sharing allows other users to open folders and files on the remote Mini via the Finder.
System Preferences → Sharing → Check "Screen Sharing". Screen Sharing allows other users to control the remote Mini via the Screen Sharing app (located in /System/Library/CoreServices).
- Allow the Mac to start without a keyboard attached
- System Preferences → Bluetooth → Advanced... → Uncheck the box marked "Open Bluetooth Assistant at startup when no input device is present".
- Allow the Mac to restart after power failure
- System Preferences → Energy Saver → Options: check the box marked "Restart automatically after power failure".
Testing
- Cold restart
- Disconnect the power cord from the Mini. Count to 5, then plug the power cord back in. Does the Mac restart? Do the rtcc and rtpd daemons start? You can check this by examining the output of ps. Something like this:
% ps -ax PID TTY TIME CMD 1 ?? 0:25.29 /sbin/launchd 10 ?? 0:01.77 /usr/libexec/kextd 11 ?? 0:04.54 /usr/sbin/DirectoryService ... (many more lines like these) ... 177 ?? 0:28.25 /Users/reftek/rtpd -bd ini=/Users/reftek/rtpd.ini ... (more lines) ... 120 ttys000 0:00.31 ./rtcc 41263 ttys001 0:00.05 -tcsh 26904 ttys002 0:00.00 ps -axIf you see rtpd and rtcc in the output, then all is well.
Try accessing rtcc from another computer on the LAN, by launching a browser and pointing it to 12.0.0.6:4001 . This should get you to the "DAS Discovery Page".
Try rt_display on another computer on the LAN.
Try logging into the Mini over the network via ssh, as user 'reftek'.
If everything works so far, continue...
- Headless cold restart
-
Disconnect every cord from the Mini (except ethernet, if you're on a wired network). Count to 5, then plug the power cord back in. Repeat the previous tests from a remote computer.
If it all works, you're done! You now have a wonderfully compact Reftek data server that you can tuck anywhere into a quiet corner of your lab. Add a Time Capsule wireless backup device, and your data are doubly secure.
Using a Mac to set the RT-130's IP address
posted 2011.05.26
The RT-130 ships with a factory-set IP address. To get the RT-130 to join your LAN, you need to change this IP address. Here are some notes on how I did this on a Mac laptop.
- Plan your network. In the following instructions the Mac lives on the network 12.0.0 and has the address 12.0.0.6 . I will assign the RT-130 the address 12.0.0.37. Where you see these addresses, substitute your own network addresses.
- Install rtcc on the Mac.
- Power-on the RT-130 and take note of the IP address in the scrolling status window (mine was 172.16.3.57). Power-off the RT-130.
- Disconnect the Mac from your LAN (unplug ethernet cable and turn off AirPort).
- System Preferences→Network. Create a new network Location and call it "reftek setup". In the "Configure" pop-up menu choose "Manually". Set the IP address to another address on the RT-130's network (I chose 172.16.3.1). Set the "Subnet mask" to 255.255.252.0. Click "Apply".
- Connect the NET (ethernet) cable from the RT-130 to your Mac. Power-on the RT-130.
- On the Mac, launch Terminal and type ping 172.16.3.57. If ping isn't connecting to the RT-130, double-check all the network settings and try again.
- Edit /Users/reftek/rtcc/rtcc.ini and add your Mac's IP address on a webclientipaddr line. Launch rtcc.
- Launch a web browser and point it to your RT-130's IP address (http://172.16.3.57:4001). This brings you to the "DAS Discovery Page".
- Fill in the following info on the "DAS Discovery Page" (p. 42 in the rtcc manual):
Host IP: 172.16.3.57 Port: 5000 Connection type: DirectClick "DAS-DISCOVERY".
This causes an additional line to appear on the screen, corresponding to the RT-130 unit. From here click the RT-130's "Status/Control" line.
- In the "Network Parameters" section, enter the following information in the "Ethernet" row:
IP Address: 12.0.0.37 IP Mask: 255.255.255.0 Gateway: 12.0.0.1Click the "Apply" button at the far right of the "Ethernet" row.
- Check the scrolling status display on the RT-130. The IP address should now read 12.0.0.37.
- Power-off the RT-130.
- Disconnect the NET (ethernet) cable from the Mac and connect it to a switch or router on your LAN. Power-on the RT-130.
- On the Mac, restore your network settings to rejoin the LAN (System Preferences→Network; select the appropriate "Location" from the pop-up menu. Click "Apply". Close System Preferences.
- Login to your network router and assign the RT-130 a fixed (reserved) IP address of 12.0.0.37.
- Launch a web browser and point it to the RT-130's new IP address (http://12.0.0.37:4001). This should bring you to the "DAS Discovery Page".